
Unswipe Android App: How to Save, Organize, and Manage Your Android Notifications complete User Guide
Have you ever accidentally dismissed an important WhatsApp message, lost a bank transaction alert, or cleared a notification before you had a chance to read it?
Android notifications are useful, but managing them can quickly become frustrating. Messages from different apps appear throughout the day, promotional alerts compete for attention, and important information can disappear with a single tap.
Unswipe helps you take control of your Android notifications by bringing them together in one organized history. You can search past alerts, group notifications by app, organize financial messages and offers, create custom notification rules, and protect your saved history with an app lock.
Whether you want to find an old message, keep track of transaction alerts, or reduce clutter in your notification bar, this guide explains how to use Unswipe and make the most of its features.
Table of Contents
What Is Unswipe?
Unswipe is an Android notification history app designed to help you organize and manage the notifications you receive from your installed applications.
Instead of relying entirely on your phone’s notification shade, you can use Unswipe as a dedicated inbox for captured notifications.
Its key features include:
- Notification history: Browse previously captured notifications in one place.
- Smart organization: Group notifications by application and category.
- Instant search: Find messages using app names, sender names, or keywords.
- Finance and offers hubs: Organize transaction alerts, promotional messages, and discount codes.
- Custom notification rules: Tag and filter notifications based on specific words or phrases.
- Notification reminders: Schedule reminders for individual alerts.
- Privacy controls: Exclude selected applications and protect access with an app lock.
- Automatic cleanup: Choose how long notifications remain stored.
- Notification bar management: Reduce clutter by blocking selected notifications from appearing in the Android notification shade.
Let’s explore how these features work and when you might find them useful.
1. Keep Your Notification History Organized
The History tab is the central place to view notifications saved by Unswipe.
Rather than searching through individual applications, you can browse notifications grouped by the app that generated them.
Browse Notifications by App
Each app card displays information such as its icon, unread notification count, total number of saved alerts, and a preview of the latest message.
Tap an app card to open its dedicated notification history.
For example, if you want to find an earlier message from WhatsApp or review a notification from Gmail, you can open the relevant app’s history instead of scrolling through unrelated alerts.
Filter Notifications by Date
Unswipe includes several date filters to help you narrow down your search.
You can choose from:
- Today
- Yesterday
- Last 7 days
- Last 30 days
- Custom date range
Suppose you remember receiving a delivery update last week but cannot recall the exact day. Instead of browsing every notification, select the appropriate date range to narrow the results.
Search for Specific Notifications
The search feature helps you locate notifications using information such as:
- App names
- Message content
- Sender names
- Notification metadata
For example, searching for a keyword such as “refund” can help you locate relevant alerts without manually opening every app’s history.
Manage Individual Notifications
Unswipe also provides tools for working with saved notifications.
Depending on what you need, you can:
- Mark an individual notification as read or unread.
- Mark all notifications as read.
- Open a notification’s details and copy its text.
- Schedule a reminder for a notification.
- Select multiple notifications and delete them together.
These options make it easier to keep your notification history useful rather than letting it become another cluttered inbox.
2. Exclude Apps You Don’t Want to Track
Not every notification needs to be saved.
You might prefer not to store alerts from certain banking applications, private messaging apps, or noisy system utilities.
Unswipe lets you exclude individual applications from notification recording.
How to Exclude an App
Follow these steps:
- Open Unswipe and navigate to Settings.
- Select Ignored apps under the History section.
- Tap Add ignored app.
- Search for or browse the installed applications.
- Select the app you want to exclude.
- Choose the appropriate exclusion option.
- Tap Confirm.
How to Exclude an App from Unswipe From History Screen
- Long-press any notification from the app you want to exclude on the History screen.
- Tap Exclude this app from the menu that appears.
- That’s it! Unswipe will stop saving notifications from that app.
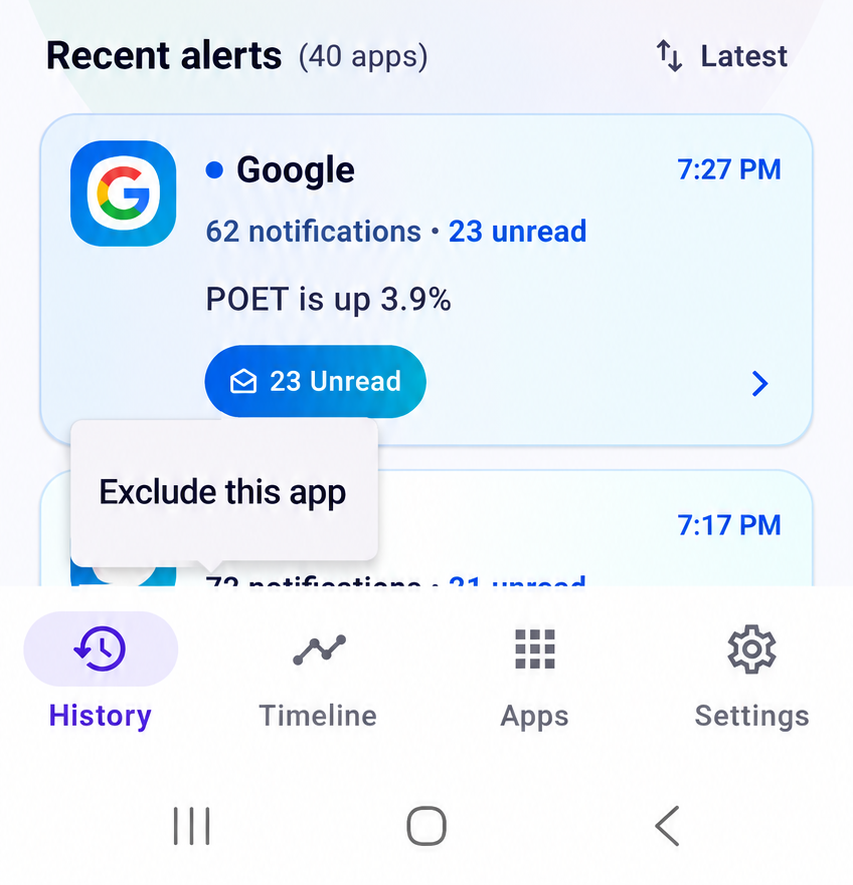
You can choose between two options:
Exclude and delete existing: Removes previously saved notifications from the selected app and stops saving new ones.
Exclude only: Keeps previously saved notifications but stops recording future notifications from that app.
You can also ignore an app directly from the History tab by long-pressing its card or a notification and selecting the ignore option.
If you change your mind, return to Settings → Ignored apps and select Unignore.
Privacy tip: If you do not want sensitive notifications from an application to be stored in your history, review your ignored-app settings carefully.
3. Pin Your Most Important Apps
Some applications deserve quicker access than others.
You might regularly check WhatsApp messages, Gmail notifications, or Telegram conversations. Instead of repeatedly searching for these applications, you can pin them to the top of your History tab.
Unswipe supports pinning up to three applications.
How to Pin an App
- Open the History tab or Apps tab.
- Find the application you want to pin.
- Long-press its card and select Pin app, or use the pin icon where available.
- Open the Pinned Apps section to access it quickly.
Pinned apps remain available at the top of your history, making frequently used notification streams easier to reach.
Choose Your Preferred Layout
Unswipe offers two ways to display pinned applications.
Horizontal layout
Displays pinned apps in a compact row. This option is useful when you want to save screen space and access several important applications quickly.
Vertical layout
Displays pinned apps as full-width cards stacked vertically. This layout provides more room for each application and may be easier to scan.
You can switch between these layouts using the control beside the Pinned Apps heading or by navigating to Settings → Pinned apps layout.
Choose the layout that feels most comfortable on your phone.
4. Organize Notifications with Smart Categories
When many applications generate notifications every day, finding a particular type of information can become difficult.
Unswipe addresses this problem with categories that organize applications and notifications by purpose.
Its Finance and Offers hubs are particularly useful for people who receive frequent transaction alerts, payment reminders, shopping promotions, and discount notifications.
Finance Hub: Keep Transaction Alerts Together
Financial notifications can contain information that you may need later, such as transaction amounts, payment references, and bill reminders.
The Finance hub helps organize supported financial notifications in one place.
It can categorize notifications such as:
- Bank credit and debit alerts
- Credit card payment notifications
- UPI transaction alerts
- Bill payment reminders
To access these notifications, tap the Finance filter at the top of the History screen.
Supported financial notifications can be grouped by date, with transaction amounts and reference numbers highlighted for convenient copying.
For example, if you need to retrieve a transaction reference from a previously captured payment notification, you can look in the Finance hub instead of searching through messages from every application.
Remember that this feature organizes captured notifications; it does not replace your banking app or provide a complete financial account statement.
Offers Hub: Find Deals and Promotional Codes
Shopping applications and food delivery services frequently send promotional messages. Important discount codes can get lost among other notifications.
The Offers hub helps bring relevant promotional notifications together.
It can organize supported notifications containing:
- Shopping sale announcements
- Food delivery coupons
- Promotional codes
- Discount alerts
Tap the Offers filter in the History screen to view relevant notifications.
Where supported, Unswipe extracts promotional codes so you can copy them more conveniently.
For example, if a shopping app sends a discount code while you are busy, you can look for the saved notification later rather than searching through the original notification stream.
Always check the offer’s validity and terms before using a code.
Customize App Categories
Automatic categorization may not always match how you prefer to organize your applications.
For example, you might want CRED to appear under Finance or move a shopping application into another category that better suits your needs.
Unswipe allows you to reassign applications to categories such as:
- Communication
- Finance
- Offers & Ads
- Social
- Shopping
- News
- Other
To change an application’s category:
- Open the Apps tab.
- Search for the application by name.
- Locate its current category badge or category-change control.
- Open the Move App Category dialog.
- Select the category you prefer.
Your manual category assignments are saved on your device, allowing the app to reflect your preferences.
You can also search for applications within a category to locate and reassign them more quickly.
This combination of automatic organization and manual control makes it easier to build a notification system that matches your habits.
5. Reduce Notification Bar Clutter
Your Android notification shade can become crowded with promotional alerts, routine updates, and notifications that you do not need to see immediately.
Unswipe includes a Block notifications feature that helps reduce this clutter.
When configured for a supported application, Unswipe can capture its notifications and dismiss them from the Android notification shade after a brief, configurable delay.
You can then review those notifications later inside Unswipe.
How to Block Notifications
- Open Unswipe.
- Navigate to Settings.
- Select Block notifications.
- Browse the installed applications.
- Turn on blocking for the apps you want to manage this way.
When a supported app sends a notification, Unswipe captures and saves it before removing it from the Android notification shade according to your settings.
This allows you to review selected notifications at a convenient time rather than having them continuously occupy your notification bar.
Important: Blocking notifications can make time-sensitive alerts less visible. Carefully consider which applications you configure, particularly those used for security alerts, urgent communications, or other critical notifications.
6. Create Custom Message Rules
Sometimes you want to find notifications containing particular words, even when they come from different applications.
For example, you might want to identify notifications containing words such as “OTP,” “Refund,” “Security Alert,” or “Server Down.”
Unswipe’s Message Rules feature lets you create keyword-based rules to organize matching notifications.
How to Create a Message Rule
- Open Settings.
- Select Message rules.
- Tap Add rule.
- Enter the keyword or phrase you want to match.
- Choose the matching condition, such as Contains or Exact Match.
- Save the rule.
When an incoming notification matches your rule, Unswipe tags it so you can filter matching notifications through the corresponding custom filter in History.
Practical Examples
Finding refund notifications
Create a rule using the keyword “Refund” to help identify relevant alerts.
Identifying security messages
Use a phrase such as “Security Alert” to organize notifications that contain that text.
Monitoring technical alerts
If you receive system notifications containing “Server Down,” you can create a rule to make those alerts easier to identify.
The usefulness of a rule depends on the wording used by the applications sending your notifications. Choose keywords that are specific enough to produce relevant results.
7. Set Custom Alerts for Important Messages
Not all notifications have the same level of urgency.
A promotional message can wait, but an emergency notification or an important production alert may require immediate attention.
Unswipe’s Custom Alerts feature allows you to define keywords that trigger a selected sound and vibration pattern.
How to Configure a Custom Alert
- Open Settings.
- Select Custom alerts.
- Tap Add alert trigger.
- Enter a keyword or phrase, such as “Urgent,” “Emergency,” or “Production Alert.”
- Choose the sound and vibration intensity.
- Save the configuration.
When a captured notification matches the configured keywords, Unswipe can trigger the corresponding alert.
For example, someone who monitors technical systems could create a rule for a phrase used in critical system alerts. This may make matching notifications easier to notice.
Keep in mind that notification delivery, background restrictions, device settings, and sound permissions can affect how alerts behave. Test your configuration before relying on it for critical situations.
8. Automatically Clean Up Old Notifications
A notification history becomes less useful when it contains too much outdated information.
At the same time, deleting everything too quickly can make it difficult to retrieve an older message when you need it.
Unswipe’s Automatic Cleanup feature lets you choose how long notifications should be retained.
Choose Your Retention Period
The available options are:
- 7 days: Keep a short history.
- 14 days: Retain notifications for approximately two weeks.
- 30 days: Keep a month’s history.
- 90 days: Maintain a longer notification history.
- Forever: Disable automatic deletion.
To configure automatic cleanup:
- Open Settings.
- Select Automatic cleanup.
- Choose your preferred retention period.
Notifications older than the selected retention window are automatically removed in the background.
Which Retention Period Should You Choose?
Your ideal setting depends on how you use notification history.
- Choose 7 or 14 days if you mainly want to recover recently dismissed notifications.
- Choose 30 days if you occasionally need to look back at earlier messages.
- Choose 90 days if you frequently refer to older notifications.
- Choose Forever if you prefer to retain notifications indefinitely, while managing storage yourself when necessary.
Remember that longer retention means more notification data may accumulate on your device.
Also, avoid treating notification history as a permanent archive for essential records. Save important documents, receipts, or financial statements in their appropriate locations.
9. Protect Your History with App Lock
Notification history can contain private conversations, transaction details, and other sensitive information.
Even if your phone is unlocked, you may not want someone else opening Unswipe and browsing those notifications.
The App Lock feature adds an authentication step before access to your notification history.
How to Enable App Lock
- Open Settings.
- Scroll to App Lock.
- Turn the feature on.
- Authenticate using an available method, such as fingerprint, face unlock, or your device lock PIN.
Once enabled, Unswipe requires authentication when it is reopened or brought to the foreground, according to the feature’s configured behavior.
This provides an additional layer of protection when someone else is using your phone.
For stronger privacy, combine App Lock with appropriate Android screen-lock settings and review which applications are allowed to have their notifications recorded.
10. Understand How Unswipe Handles Your Data
Privacy is especially important for a notification history app because notifications can contain personal information.
According to Unswipe’s documentation, the app follows an on-device storage approach.
Notifications Are Stored Locally
Unswipe stores captured notifications in a local database on your Android device.
The documented storage model does not require you to create an account or log in to a cloud service to use notification history.
The app’s documentation also states that notifications remain on your device rather than being sent to external tracking servers.
This approach is designed to keep notification history under your control.
However, local storage does not automatically make every notification safe to retain. Your phone can still be accessed by someone who has the necessary permissions or authentication access.
Review Your Privacy Settings
For better control over your notification data:
- Exclude applications whose notifications you do not want recorded.
- Use App Lock to restrict access to your saved history.
- Delete notifications you no longer need.
- Choose an appropriate automatic cleanup period.
- Avoid sharing screenshots that expose personal information.
Banking notifications, one-time passwords, private messages, phone numbers, and transaction details can all contain sensitive information.
A good privacy practice is to save only what you need and limit access to the information you keep.
11. Improve Background Reliability on Android
Android phones use battery-management features to limit background activity. Depending on the device manufacturer and its settings, these restrictions can affect applications that need to operate in the background.
Unswipe includes a Background Reliability section to help users review relevant settings.
Check Background Reliability Settings
Open Settings in Unswipe and select Background reliability.
Review the available options, which may include:
Unrestricted battery usage
Allowing unrestricted battery usage can help prevent Android from restricting Unswipe’s background activity.
Exact alarms
Where required and permitted, exact-alarm access supports features that depend on precise scheduled timing, such as reminders or cleanup tasks.
Auto-start and background activity
Some devices offer additional controls for applications that need to run in the background.
On supported devices, you may need to open Android’s system settings and look for options such as Allow background activity or Auto-start.
The exact menu names vary between manufacturers and Android versions.
What If Notifications Are Missing?
If Unswipe stops capturing notifications reliably, try the following checks:
- Confirm that the necessary Android notification access is enabled for Unswipe.
- Check whether the application has been restricted by battery optimization.
- Review background activity or auto-start settings if your phone provides them.
- Check whether the source application is actually generating the expected notification.
- Test the behavior after changing a setting.
These checks can help identify common configuration issues, although they cannot guarantee uninterrupted background operation on every device.
12. Get More Help with Unswipe
If you need additional guidance, troubleshooting instructions, or video tutorials, consult the official Unswipe support documentation.
You can find it here:
Unswipe Support: https://support.druanlabs.com/unswipe-android-app/
The support page is the appropriate place to look for additional information about app features and configuration.
Frequently Asked Questions
Can Unswipe save notifications after I dismiss them?
Unswipe is designed to save captured notifications in its history so that you can review them later. Whether a particular notification is saved depends on notification access, app configuration, and whether Unswipe captures it while it is available.
It should not be assumed that notifications dismissed before capture can always be recovered.
Can I search for an old notification?
Yes. You can search across supported notification information, including app titles, message bodies, sender names, and notification metadata.
You can also filter by date to narrow your results.
Can I stop a specific app from saving notifications?
Yes. Open Settings → Ignored apps and select the application you want to exclude.
You can choose whether to delete its existing saved notifications or retain them while ignoring future notifications.
Can I organize my financial notifications separately?
Yes. Unswipe includes a Finance hub for organizing supported bank alerts, credit card notifications, UPI transaction alerts, and bill reminders.
Can I move an application into a different category?
The available results depend on the notifications captured by the app. Yes. Open the Apps tab, search for the application, and use its category control to choose another category.
Your manual category assignments are saved on the device.
Can I stop notifications from cluttering my Android notification bar?
Unswipe’s Block notifications feature can capture and dismiss notifications from selected applications according to its configuration.
Choose the applications carefully because blocking visible alerts can make important messages easier to overlook.
How long does Unswipe keep notifications?
You can choose a retention period of 7, 14, 30, or 90 days, or select Forever to disable automatic deletion.
Does Unswipe require a cloud account?
According to its documentation, Unswipe stores captured notifications locally and does not require an account or cloud login for its notification history features.
Can I protect my notification history with a password or fingerprint?
Unswipe offers an App Lock feature that uses an available device authentication method, such as fingerprint, face unlock, or the device lock PIN.
The available authentication methods depend on your device and configuration
Final Thoughts: Take Control of Your Android Notifications
Notifications are meant to keep you informed, but they can become difficult to manage when dozens of applications compete for your attention.
Unswipe brings several useful tools together in one place: searchable notification history, pinned applications, smart categories, keyword-based rules, custom alerts, automatic cleanup, and privacy controls.
You can start with the features that solve your biggest problems.
- If you frequently lose track of messages, start with History and Search.
- If your notification shade is crowded, explore Block notifications.
- If you receive many payment alerts, try the Finance hub.
- If you want to find promotional codes more easily, use the Offers hub.
- If privacy is your priority, review Ignored apps and enable App Lock.
- If you want to keep your history manageable, configure Automatic cleanup.
The goal is not to collect every notification forever. It is to make useful information easier to find while keeping unnecessary distractions under control.
Explore Unswipe, customize the settings to suit your needs, and build a notification system that works for you.